Tuesday, July 17, 2012

Google Blockly in Blender

Hacking around with Google Blockly and Blender. Blockly inside of Blender could be useful for game play scripting and other things. At the moment this is just a proof of concept how to get WebKit and Blockly to load inside of Blender and have simple two-way communication.

This hack is standalone, and already includes Blender2.63 compiled by natewiebe13 from Graphicall.org. To get this running, all you need to do is: "sudo apt-get install libwebkitgtk-3.0-dev" download here

Hello World Source Code

import bpy

def myprocedure():
 '''
 user defined function, in blockly just define an empty function,
 and give it the name "myprocedure"
 '''
 bpy.ops.mesh.primitive_monkey_add()


###############################################
import os, sys, time, ctypes

sys.path.append( os.path.abspath('.') )
import webkitgtk as webkit
import Blender # brett's ctypes wrapper to libblender

gtk = glib = webkit # webkit links to gtk and glib
gtk.init()


def get_html():
 dom = view.get_dom_document()
 html = webkit.dom_html_element_get_inner_html( dom )
 return html

def call_javascript( script ):
 '''
 this won't work because it kills newlines!
  view.execute_script('document.title=%s;' %script)
 '''
 view.execute_script(
  "document.getElementsByTagName('text_hack')[0].setAttribute('x',%s);"%script
 )
 result = get_html()
 result = result.split('text_hack x="')[-1]
 result = result.split('"')[0]
 return result

def hack_code( script ):
 '''
 need to hack the script a bit, blockly generates python2,
 and blender needs python3!
 '''
 a = []
 for line in script.splitlines():
  if "print '" in line:
   line = line.replace("print '", "print('") + ')'
  if line == 'null': continue # blockly bug?
  elif line.strip() == 'passnull': # check for an undefined function and remove it
   a.pop()
   continue
  a.append(line)
 script = '\n'.join(a)
 print('----------- python code -------------')
 print(script)
 return script

def execute_python( script ):
 script = hack_code( script )
 print('----------- exec python code -------------')
 exec( script )


################### WebKitGTK ####################
view = webkit.webkit_web_view_new()
print(view)


settings = webkit.web_settings_new()
for prop in 'enable-webaudio enable-file-access-from-file-uris enable-universal-access-from-file-uris enable-developer-extras enable-accelerated-compositing enable-webgl'.split():
 gval = glib.GValue(True)
 glib.g_object_set_property( settings, prop, gval )
view.set_settings( settings )

view.load_uri( 'file://%s/test-blockly.html'%os.path.abspath('.'))


win = gtk.Window()
root = gtk.VBox()
win.add( root )

header = gtk.HBox()
root.pack_start( header, expand=False )


button = gtk.Button('print html')
button.connect('clicked', lambda b: get_html() )
header.pack_start( button, expand=False )

header.pack_start( gtk.Label() )

button = gtk.Button('print python')
button.connect('clicked', lambda b: hack_code(call_javascript("Blockly.Generator.workspaceToCode('Python')")) )
header.pack_start( button, expand=False )

button = gtk.Button('run python')
button.connect('clicked', lambda b: execute_python(call_javascript("Blockly.Generator.workspaceToCode('Python')")) )
header.pack_start( button, expand=False )


root.pack_start( view, expand=True )

win.set_default_size( 800, 600 )
win.show_all()

class BlenderHack(object):
 def update_gtk(self, region):
  while gtk.gtk_events_pending():
   gtk.gtk_main_iteration()


 def setup_blender_hack(self, context):
  self._sync_hack_handles = {} # region : handle
  self.default_blender_screen = context.screen.name
  self.evil_C = Blender.Context( context )

  for area in context.screen.areas:
   if area.type == 'VIEW_3D':
    for reg in area.regions:
     if reg.type == 'WINDOW':
      handle = reg.callback_add( self.update_gtk, (reg,), 'POST_PIXEL' )
      self._sync_hack_handles[ reg ] = handle

  return self._sync_hack_handles

 def mainloop(self):
  self.active = True
  while self.active:
   screen = bpy.data.screens[ self.default_blender_screen ]
   ## force a redraw on the 3d view
   for area in screen.areas:
    if area.type == 'VIEW_3D':
     for reg in area.regions:
      if reg.type == 'WINDOW':
       reg.tag_redraw()
       break
   ## iterate blender's mainloop from ctypes
   Blender.iterate( self.evil_C )
   time.sleep(0.01)


hack = BlenderHack()
hack.setup_blender_hack( bpy.context )
hack.mainloop()
print('exit to normal blender mainloop')

Saturday, June 16, 2012

WebGL - Optimized Streaming


Level of Interest

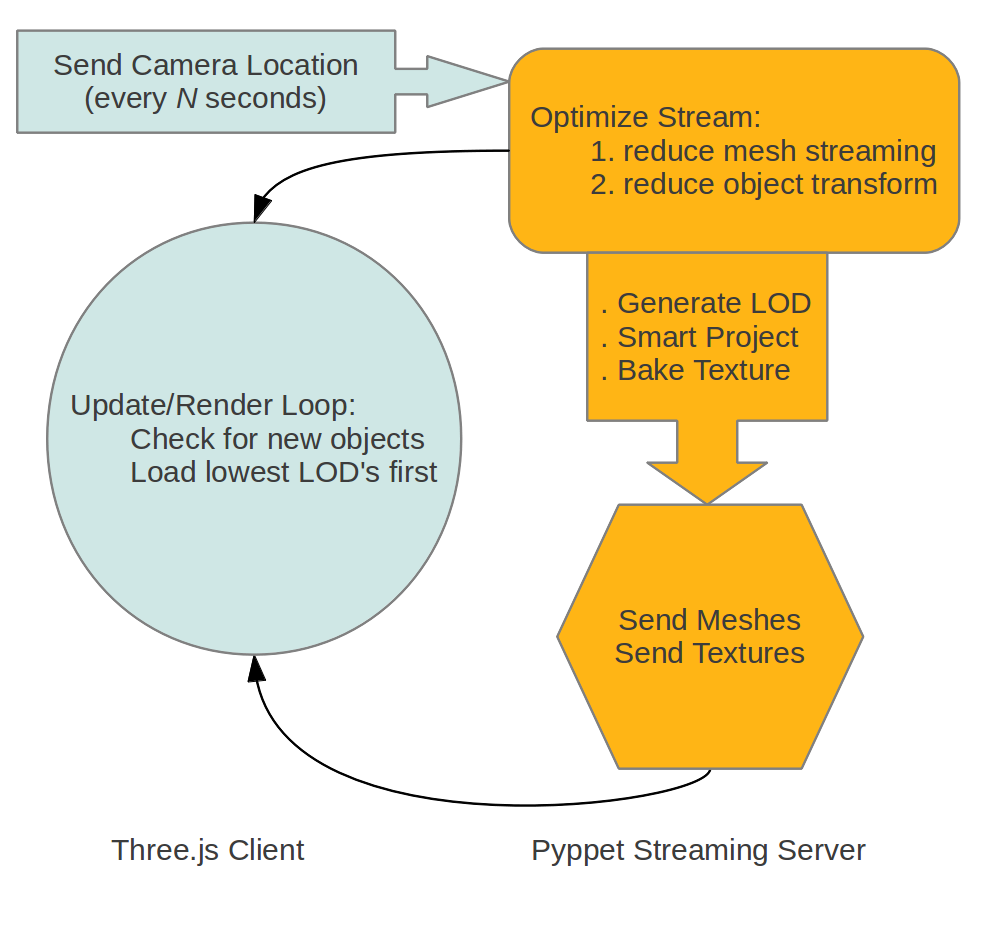
The client sends camera location updates back to the server. The server then optimizes the client stream, first only stream dynamic mesh for objects very near to the camera, and reduce object transform update as an object becomes more distant to the camera.

Level of Detail

To have the scene load as fast as possible for the client, the server streams the lowest level of detail LOD's to the client first, and then slowly sends the higher resolution mesh and textures. LOD's are generated and cached on the fly by the server and could be adaptive to target the clients profile (mobile or desktop).
For each generated LOD the reduction in triangles can be set to any amount, because we do not attempt to preserve UV mapping or sharing materials and textures among LODs - instead we use Blender's decimate modifier to reduce the mesh, uv smart project to generate new UV's, and then generate a new texture using Blender's bake with "selected to active object" using the high resolution mesh as the source of the bake. (baking down to a single material and single texture provides client side performance gains as well, by reducing GPU material/context switching)
Three.js has another feature we can use to improve LOD, subdivision surfaces! This puts no extra bandwidth strain on the server because the subdivision is all done on the client side. Note that in this video the frame rate drops on subdivision because the subdivision is recalculated every frame, this could easily be optimized to only recalculate when crossing the LOD distance threshold.

Streaming Curve Data

Another feature in development is streaming curve data, and later on other types of shapes. This can also greatly reduce server bandwidth because only the control points of the curve need to be streamed, the extrusion to triangles is all done client-side.

Friday, April 27, 2012

Rpython to LLVM - Part2

In the last post we saw that Rpython-to-LLVM can be 200X faster than Python in a tight loop. What happens when the loop gets more complicated? This next test introduces a Vector class, and using a new decorator, the LLVM backend can translate instances of this class into the SSE optimized LLVM vector type.
@rpy.vector( type='float32', length=4 )
class Vector(object):
 def __init__(self, x=.0, y=.0, z=.0):
  self.x = x
  self.y = y
  self.z = z

 def __getitem__(self, index):
  r = .0
  if index == 0: r = self.x
  elif index == 1: r = self.y
  elif index == 2: r = self.z
  return r

 def __setitem__(self, index, value):
  if index == 0: self.x = value
  if index == 1: self.y = value
  if index == 2: self.z = value

 def __add__( self, other ):
  x = self.x + other.x
  y = self.y + other.y
  z = self.z + other.z
  return Vector( x,y,z )

The new decorator is "rpy.vector( type, length )" and for best SSE performance it should be of type float32 with length 4 (even if you only use 3).

Test Function:

def test(x1, y1, z1, x2, y2, z2):
 a = Vector(x1, y1, z1)
 b = Vector(x2, y2, z2)
 i = 0
 c = 0.0
 while i < 16000000:
  v = a + b
  c += v[0] + v[1] + v[2]
  i += 1
 return c

Test Results:

  • Python2 = 51 seconds
  • Rpython-to-LLVM = 0.019 seconds
How could LLVM be 2,680X faster than standard Python? It turns out in this case LLVM is able to optimize the while-loop by moving many operations into the "function entry" and reducing the work the while-loop needs to do (see the optimized LLVM ASM below).

LLVM ASM

define float @test(float %x1_0, float %y1_0, float %z1_0, float %x2_0, float %y2_0, float %z2_0) {
entry:
  %0 = insertelement <4 x float> , float %x1_0, i32 0
  %1 = insertelement <4 x float> %0, float %y1_0, i32 1
  %2 = insertelement <4 x float> %1, float %z1_0, i32 2
  %3 = insertelement <4 x float> , float %x2_0, i32 0
  %4 = insertelement <4 x float> %3, float %y2_0, i32 1
  %5 = insertelement <4 x float> %4, float %z2_0, i32 2
  %vecadd = fadd <4 x float> %2, %5              
  %element = extractelement <4 x float> %vecadd, i32 0 
  %element3 = extractelement <4 x float> %vecadd, i32 1
  %v5 = fadd float %element, %element3           
  %element4 = extractelement <4 x float> %vecadd, i32 2
  %v7 = fadd float %v5, %element4                
  br label %while_loop

while_loop:                                    
  %st_c_0.0 = phi float [ 0.000000e+00, %entry ], [ %v8, %while_loop.while_loop_crit_edge ]
  %st_i_0.0 = phi i32 [ 0, %entry ], [ %v9, %while_loop.while_loop_crit_edge ]
  %v8 = fadd float %st_c_0.0, %v7                
  %v9 = add i32 %st_i_0.0, 1                     
  %v10 = icmp ult i32 %v9, 16000000               
  br i1 %v10, label %while_loop.while_loop_crit_edge, label %else

while_loop.while_loop_crit_edge:                  
  br label %while_loop

else:                                             
  %v8.lcssa = phi float [ %v8, %while_loop ]      
  ret float %v8.lcssa
}

Part2: Escaping the GIL

llvm-py contains an example "call-jit-ctypes.py" that shows you how to bypass the LLVM Execution Engine and instead call your compiled function via ctypes. The advantage of using ctypes over the Execution Engine is that ctypes will release the GIL and allows your Python threads to run in parallel. The next test simply calls the same function four times from four threads at the same time.

Test 4 Threads:

  • LLVM Execution Engine = 0.086 seconds
  • Ctypes = 0.025 seconds
As we can see in this test with 4 threads, ctypes is 3.4X faster on a quad core CPU. Note that another way to escape the GIL is the multiprocessing module, there are pros and cons for both processes and threads. Rpythonic now uses ctypes by default to call the compiled LLVM functions, so its up to you to decide if you want to take advantage of threads or not.

Sunday, April 22, 2012

Rpython to LLVM

Psyco and Unladen Swallow were the first to try to make a just-in-time compiler (JIT) for Python, but these projects have stopped, leaving standard Python with no good JIT solution. So I started investigating how hard would it be to make a JIT for Python using Rpython and LLVM. The results of my first highly experimental implementation of Rpython-to-LLVM show very fast JIT performance: 4x faster than PyPy, 200x faster than Python2, and 260x faster than Python3.

Test Function

def simple_test(a, b):
 c = 0
 while c < 100000*100000:
  c += a + b
 return c
The test function is simply a huge loop that adds-to and returns a 64bit integer. The test was performed on a AMD 2.4ghz Quad with 4GB of RAM, average test result times are:
  • Rpython-to-LLVM = 2 seconds
  • PyPy1.8 (with warm JIT) = 8 seconds
  • Python2.7.2 = 400 seconds
  • Python3.2.2 = 530 seconds

Building The JIT

The first challenge in this project was building the code that traverses the Rpython flow-graph ("flow object space") and converts it into LLVM format. For each Rpython flow-graph block a new LLVM basic-block is created, and for each operation in the block a new LLVM instruction is created. Blocks that loop and modify a variable require some extra work, these mutable variables are treated as stack allocations, and then the LLVM optimization pass PROMOTE_MEMORY_TO_REGISTER replaces the costly stack allocations with fast register memory. It is interesting to see what LLVM IR looks like for the simple function used in this test, before and after the PROMOTE_MEMORY_TO_REGISTER optimization.
Raw LLVM IR
define i64 @simple_test(i64 %a_1, i64 %b_1) {
entry:
  %st_a_1 = alloca i64                            ;  [#uses=2]
  store i64 %a_1, i64* %st_a_1
  %st_b_1 = alloca i64                            ;  [#uses=2]
  store i64 %b_1, i64* %st_b_1
  %st = alloca i64                                ;  [#uses=1]
  store i64 0, i64* %st
  %st_v2 = alloca i64                             ;  [#uses=4]
  store i64 %a_1, i64* %st_v2
  br label %while_loop

while_loop:                                       ; preds = %while_loop, %entry
  %a_0 = load i64* %st_a_1                        ;  [#uses=1]
  %b_0 = load i64* %st_b_1                        ;  [#uses=1]
  %v0 = add i64 %a_0, %b_0                        ;  [#uses=1]
  %v1 = load i64* %st_v2                          ;  [#uses=1]
  %v2 = add i64 %v1, %v0                          ;  [#uses=2]
  store i64 %v2, i64* %st_v2
  %v3 = icmp ult i64 %v2, 10000000000             ;  [#uses=1]
  br i1 %v3, label %while_loop, label %else_return

else_return:                                      ; preds = %while_loop
  %0 = load i64* %st_v2                           ;  [#uses=1]
  ret i64 %0
}
LLVM IR (after PROMOTE_MEMORY_TO_REGISTER)
define i64 @simple_test(i64 %a_1, i64 %b_1) {
entry:
  br label %while_loop

while_loop:                                       ; preds = %while_loop, %entry
  %st_v2.0 = phi i64 [ %a_1, %entry ], [ %v2, %while_loop ] ;  [#uses=1]
  %v0 = add i64 %a_1, %b_1                        ;  [#uses=1]
  %v2 = add i64 %st_v2.0, %v0                     ;  [#uses=3]
  %v3 = icmp ult i64 %v2, 10000000000             ;  [#uses=1]
  br i1 %v3, label %while_loop, label %else_return

else_return:                                      ; preds = %while_loop
  ret i64 %v2
}

LLVM Advantages

LLVM is more than just a JIT, because LLVM IR is platform independent, it becomes the best solution for making Python extension modules that need to support all platforms and all Python versions. A classic Python extension module is written in C, and must be compiled for each Python version, each OS, and each OS type (32bit and 64bits)! (Python2+Python3+PyPy)*(Linux+OSX+Windows)*(32bits+64bits) = 18 targets. How is anybody supposed to compile their Python extension for all 18 targets? LLVM IR can be generated on any platform any bit-depth, saved to a file, and later loaded and run on any target that PyLLVM supports. PyLLVM works with Python2 and Python3; and is easily portable to PyPy using cpyext. In other words, LLVM IR can easily hit all 18 targets - no problem.
Extra Advantages:

  • LLVM easily calls into C libraries
  • LLVM has a SIMD accelerated vector type
  • LLVM has powerful optimizations like: PROMOTE_MEMORY_TO_REGISTER
  • Rpython and LLVM are a natural fit
Still not convinced? Read what Intel has to say about LLVM.

source code

requires Mahadevan's PyLLVM

Wednesday, February 1, 2012

Progressive Baking


Texture maps are progressively downloaded from the Blender integrated server. Baking happens on demand and is fully automated. Client side javascript code adapts the texture request to best fit the given shader. Supported texture layers: diffuse, AO, specular intensity and displacement.

Hardware Displacement Mapping


The base mesh (without subdivision) is sent to the client. The client then applies subdivision and recalculates the tangents. The displacement map is progressively downloaded starting at 64x64 and stopping at 512x512 resolution. The displacement happens in hardware using GLSL shader model 3.0. Code recycled from the Three.js examples.

Tuesday, January 24, 2012

Pyppet - WebGL Streaming


Check out Three.js on github and get ready to be blown away, so much power in 380KB.

Websockets Streaming Mesh - WebGL Client


Websockify by Joel Martin has got everything you need to get websockets going in Python3.

Supported Streaming Modifiers


  • Cast,
  • Curve,
  • Displace,
  • Hook,
  • Lattice,
  • MeshDeform,
  • ShrinkWrap,
  • SimpleDeform,
  • Smooth,
  • Warp,
  • Wave


Streaming the default blender monkey head (500 vertices) to the web-client creates a load of about 350KB per-second. This is still using ASCII Json for transport, so hopefully in the future a binary stream or other packing method could cut this down even more.

Thursday, January 5, 2012

Pyppet2 - Audio Analysis


Prototype for real-time musical performance at live events, concerts. TODO: OSC integration to support pro music hardware, sample mixer integrated with physics system (collisions trigger sounds), particles, multiple full screen windows and camera switching driver input.

Blenderartists thread

pyppet 1.9.3b source code

Update


linux install guide
feature requests approved:


  • "assign multiple movement and rotation controls to one OSC input"

  • "adjust scale, and attack/release function" (callbacks)

Wednesday, July 6, 2011

C++ Wrapper Generator - Part1

There are several ways to wrap C++ and integrate it with Python, have a look on stackoverflow. Many wrapper generators rely on GccXML, but the project has been dead for years and has trouble parsing some newer C++. Another option is Swig, still active, but appears to require hand written wrapper code, and lacks support for things like nested classes. Clang was yet another option, it was able to output its parse tree as XML, but this feature was recently broken. So after much searching I finally found CppHeaderParser by Jashua Cloutier on SourceForge, the source code is all contained in a single file and very easy to understand. Since then (back in March), in my free time, I have been hacking away on CppHeaderParser; adding support for parsing more complex C++, resolving typedef's, nested classes, etc. For anyone else interesting in building a wrapper generator on top of it, you will be happy to hear it remains less than 2,000 lines of code, and very easy to modify to fit your particular needs. It is already being used successfully by the Emscripten project to generate a C wrapper and Javascript bindings, kripken's blog.

RPythonic-0.3.8 uses CppHeaderParser-2.0 as a backend to parse the C++ code and generate a C wrapper and Python-ctypes bindings. There is going to be a speed hit calling C++ through a C API over ctypes. Future work will solve the speed problem by generation of RPython (RFFI) bindings so that RPython can call into C++ code.

Work on both CppHeaderParser and the wrapper generator will continue, and should stablize in the next few releases. Basic features that are working now include: operators (==, +=, -=, etc.), enums, typedefs, classes and nested classes, class properties, structs, arrays, doxygen, and C compatible types. The major missing feature is wrapping of templates.

download all wrapper generator samples here


C Wrapper Sample - OgrePaged Method Call


/* Forests::TreeLoader3D.addTree */
/** \brief Adds an entity to the scene with the specified location, rotation, and scale.
\param entity The entity to be added to the scene.
\param position The desired position of the tree
\param yaw The desired rotation around the vertical axis in degrees
\param scale The desired scale of the entity

While TreeLoader3D allows you to provide full 3-dimensional x/y/z coordinates,
you are restricted to only yaw rotation, and only uniform scale.

\warning By default, scale values may not exceed 2.0. If you need to use higher scale
values than 2.0, use setMaximumScale() to reconfigure the maximum. */
/*void addTree ( Ogre : : Entity * entity , __const__ Ogre : : Vector3 & position , Ogre : : Degree yaw = Ogre : : Degree ( 0 ) , Ogre : : Real scale = 1 0f , void * userData = __null ) ;
returns_fundamental: True
returns_pointer: 0
returns_reference: False
returns: void
returns_class: False
*/
void TreeLoader3D_addTree( void* object, void* arg0, void* arg1, void* arg2 ) {
((Forests::TreeLoader3D*)object)->addTree(
//type: Ogre::Entity *, raw_type: Ogre::Entity, pointer: 1, ,
(Ogre::Entity*)arg0,
//type: const Ogre::Vector3 &, raw_type: Ogre::Vector3, constant: 1, reference: 1, ,
(Ogre::Vector3&)arg1,
//type: Ogre::Degree, raw_type: Ogre::Degree, default: Ogre : : Degree ( 0, ,
(Ogre::Degree&)arg2 );
}


C Wrapper Sample - BulletPhysics - Set Property


/* --------------- class btVector3 --------------- */
/* */
/**@brief btVector3 can be used to represent 3D points and vectors.
* It has an un-used w component to suit 16-byte alignment when btVector3 is stored in containers. This extra component can be used by derived classes (Quaternion?) or by user
* Ideally, this class should be replaced by a platform optimized SIMD version that keeps the data in registers
*/
/* ---------properties--------- */
//type: btScalar, raw_type: btScalar, typedefs: 1, fundamental: True, array: 4, ctypes_type: ctypes.c_float,
void btVector3_m_floats__property_set__( void* object,btScalar arg[4] ) {
((btVector3*)object)->m_floats[ 0 ] = arg[ 0 ];
((btVector3*)object)->m_floats[ 1 ] = arg[ 1 ];
((btVector3*)object)->m_floats[ 2 ] = arg[ 2 ];
((btVector3*)object)->m_floats[ 3 ] = arg[ 3 ]; }


C Wrapper Sample - BulletPhysics - Operator Overloading


/**@brief Scale the vector
* @param s Scale factor */
/*} inline btVector3 & operator * = ( __const__ btScalar & s ) {
returns_fundamental: False
returns_pointer: 0
returns_reference: True
returns: btVector3
returns_class: True
*/
void* btVector3___operator____imult__( void* object, const btScalar & arg0 ) {
return (void*)(& (((btVector3&)object)*=(arg0)) );
}


Pass1: Generate C Wrapper


  • flatten all method calls to functions

  • the instance is passed as the first argument

  • all instances are passed as void pointers

  • C compatible types are passed directly

  • objects returned are cast to void pointers

  • create wrapper functions for operators

  • create wrapper functions for get/set properties


Pass2: Generate Python-ctypes Wrapper


  • create a Python class for each C++ class

  • __init__ calls the constructor C wrapper

  • each method calls the C wrapper function

  • methods that return instances are passed to the matching python class

  • __del__ calls the destructor

  • operators overload: __mult__, __add__, etc..

  • __getattr__, __setattr__ call the get/set wrapper functions

Thursday, May 19, 2011

ODE-ctypes in Blender


http://rpythonic.googlecode.com/files/Active-Physics-Blender-release1.zip


ODE-ctypes addon for blender is deprecated, code moved into Pyppet2 core engine.

Tuesday, May 10, 2011

Kinect Hand Tracking


Ctypes and Threads


Check out this ctypes technique to escape the GIL.


Fast Hand Detection


HAAR wavelets are by far the most popular way of detecting hands or other features, the problem is speed, the Haar cascade can easily take a single core to 100% usage, and this is not suitable if we plan to run this hand detector within another program like Blender or RealXtend and maintain good performance.

Another method that is faster is to check for convexity defects of contours, this blog by Andol has a good overview of the techniques. Using the heuristic 4 or more defects is hand, and simply checking for defects among the many contour passes will yield false-positives from noise. The first trick is to filter out this noise on the contour with extreme polygon reduction, using the function cv.ApproxPoly with a factor of 20-30.0 or more. This reduces the head to a few triangles, while keeping the star-shape of the hand.

Monday, April 18, 2011

RPython modules for CPython


It is now possible to use RPythonic to write CPython extension modules in RPython, RPythonic will work as the front-end that uses the PyPy translation toolchain to generate C code, compile it with GCC, package it in a cache directory with generated ctypes wrappers, and finally replace the decorated functions in-place in CPython.

RPythonic 0.2.8


RPython CPython Module API


import os, sys
sys.path.append('..')
import rpythonic
rpythonic.set_cache( '../cache' )
rpythonic.set_pypy_root( '../../pypy' )
################################
rpy = rpythonic.RPython()
@rpy.bind() # declare arg types is optional if,
def add( a=1, b=1000 ): # keyword defaults are given
return a+b
@rpy.bind(a=float, b=float)
def sub( a, b ):
return a-b
rpy.cache('test1') # only compiles if cache is dirty
########### now functions are using compiled version ###########
print add( 99, 88 )

Module Compiling and Caching


Sunday, November 14, 2010

Blender Python Operator API

The classic __init__ method is not used when defining a custom bpy operator. Instead you will define class-level attributes using the types in bpy.props: BoolProperty, StringProperty, FloatProperty, IntProperty, etc. Ignore that the values returned by bpy.props types are always a tuple with the first item a pointer to the property function just-called, and the second item a dictionary that contains the arguments you passed to the property function.

bpy.types


All widgets and operators dynamically appear in the bpy.types listing object. Care must be taken to give your operator a unique class name, and a unique 'bl_idname'. By not giving a unique name you can override blender's default behavior or interface. For example lets override the INFO menu with extra buttons.


class INFO_HT_header(bpy.types.Header):
bl_space_type = 'INFO'
def draw(self, context):
layout = self.layout
wm = context.window_manager
window = context.window
scene = context.scene
rd = scene.render
layout.operator("wm.window_fullscreen_toggle", icon='FULLSCREEN_ENTER', text="")
#layout.operator("ogre_export", text="Ogre")
row = layout.row(align=True)
sub = row.row(align=True)
sub.menu("INFO_MT_instances")
sub.menu("INFO_MT_groups")
sub.menu("INFO_MT_actors")
sub.menu("INFO_MT_dynamics")

if True: #context.area.show_menus:
sub.menu("INFO_MT_file")
sub.menu("INFO_MT_add")
if rd.use_game_engine: sub.menu("INFO_MT_game")
else: sub.menu("INFO_MT_render")
layout.separator()
if window.screen.show_fullscreen:
layout.operator("screen.back_to_previous", icon='SCREEN_BACK', text="Back to Previous")
layout.separator()
else:
layout.template_ID(context.window, "screen", new="screen.new", unlink="screen.delete")

layout.separator()
layout.template_running_jobs()
layout.template_reports_banner()

layout.separator()
if rd.has_multiple_engines:
layout.prop(rd, "engine", text="")
layout.template_header()
if context.area.show_menus:
layout.template_ID(context.screen, "scene", new="scene.new", unlink="scene.delete")
layout.label(text=scene.statistics())
layout.menu( "INFO_MT_help" )
else:
screen = context.screen
row = layout.row(align=True)
row.operator("screen.frame_jump", text="", icon='REW').end = False
row.operator("screen.keyframe_jump", text="", icon='PREV_KEYFRAME').next = False
if not screen.is_animation_playing:
row.operator("screen.animation_play", text="", icon='PLAY_REVERSE').reverse = True
row.operator("screen.animation_play", text="", icon='PLAY')
else:
sub = row.row()
sub.scale_x = 2.0
sub.operator("screen.animation_play", text="", icon='PAUSE')
row.operator("screen.keyframe_jump", text="", icon='NEXT_KEYFRAME').next = True
row.operator("screen.frame_jump", text="", icon='FF').end = True

row = layout.row(align=True)
if not scene.use_preview_range:
row.prop(scene, "frame_start", text="Start")
row.prop(scene, "frame_end", text="End")
else:
row.prop(scene, "frame_preview_start", text="Start")
row.prop(scene, "frame_preview_end", text="End")

layout.prop(scene, "frame_current", text="")


def gather_instances():
instances = {}
for ob in bpy.data.objects:
if ob.data and ob.data.users > 1:
if ob.data not in instances: instances[ ob.data ] = []
instances[ ob.data ].append( ob )
return instances

def select_instances( context, name ):
for ob in bpy.data.objects: ob.select = False
ob = bpy.data.objects[ name ]
if ob.data:
inst = gather_instances()
for ob in inst[ ob.data ]: ob.select = True
bpy.context.scene.objects.active = ob

def select_group( context, name, options={} ):
for ob in bpy.data.objects: ob.select = False
for grp in bpy.data.groups:
if grp.name == name:
bpy.context.scene.objects.active = grp.objects[0]
for ob in grp.objects: ob.select = True

class INFO_MT_instances(bpy.types.Menu):
bl_label = "Instances"
def draw(self, context):
layout = self.layout
inst = gather_instances()
for data in inst:
ob = inst[data][0]
op = layout.operator("select_instances", text=ob.name) # operator has no variable for button name?
op.mystring = ob.name
layout.separator()

class INFO_MT_instance(bpy.types.Operator):
'''select instance group'''
bl_idname = "select_instances"
bl_label = "Select Instance Group"
bl_options = {'REGISTER', 'UNDO'}
mystring= StringProperty(name="MyString", description="...", maxlen=1024, default="my string")
@classmethod
def poll(cls, context): return True
def invoke(self, context, event):
print( 'invoke select_instances op', event )
select_instances( context, self.mystring )
return {'FINISHED'}

class INFO_MT_groups(bpy.types.Menu):
bl_label = "Groups"
def draw(self, context):
layout = self.layout
for group in bpy.data.groups:
op = layout.operator("select_group", text=group.name) # operator no variable for button name?
op.mystring = group.name
layout.separator()

class INFO_MT_group(bpy.types.Operator):
'''select group'''
bl_idname = "select_group"
bl_label = "Select Group"
bl_options = {'REGISTER', 'UNDO'}
mystring= StringProperty(name="MyString", description="...", maxlen=1024, default="my string")
@classmethod
def poll(cls, context): return True
def invoke(self, context, event):
select_group( context, self.mystring )
return {'FINISHED'}

class INFO_MT_actors(bpy.types.Menu):
bl_label = "Actors"
def draw(self, context):
layout = self.layout
for ob in bpy.data.objects:
if ob.game.use_actor:
op = layout.operator("select_actor", text=ob.name)
op.mystring = ob.name
layout.separator()

class INFO_MT_actor(bpy.types.Operator):
'''select actor'''
bl_idname = "select_actor"
bl_label = "Select Actor"
bl_options = {'REGISTER', 'UNDO'} # Options for this panel type
mystring= StringProperty(name="MyString", description="...", maxlen=1024, default="my string")
@classmethod
def poll(cls, context): return True
def invoke(self, context, event):
bpy.data.objects[self.mystring].select = True
return {'FINISHED'}

class INFO_MT_dynamics(bpy.types.Menu):
bl_label = "Dynamics"
def draw(self, context):
layout = self.layout
for ob in bpy.data.objects:
if ob.game.physics_type in 'DYNAMIC SOFT_BODY RIGID_BODY'.split():
op = layout.operator("select_dynamic", text=ob.name)
op.mystring = ob.name
layout.separator()

class INFO_MT_dynamic(bpy.types.Operator):
'''select dynamic'''
bl_idname = "select_dynamic"
bl_label = "Select Dynamic"
bl_options = {'REGISTER', 'UNDO'} # Options for this panel type
mystring= StringProperty(name="MyString", description="...", maxlen=1024, default="my string")
@classmethod
def poll(cls, context): return True
def invoke(self, context, event):
bpy.data.objects[self.mystring].select = True
return {'FINISHED'}

Monday, October 4, 2010

Inside The Blender C API - Part2

In the "main" function of "creator.c" the function call "WM_keymap_init(C)" ('C' blender-context) setups basic mouse and keyboard handling. Calls to CTX_wm_manager(C) which returns a pointer to the wmWindowManager struct contained by C. WM_keymap_init, a new wmKeyConfig struct is created by WM_keyconfig_new, passed to: wm_window_keymap, ED_spacetypes_keymap, and WM_keyconfig_userdef. Finally the wmKeyConfig is assigned to the wmWindowManager struct as `defaultconf`.

Blender Context.

bContext

:
blender/source/blender/blenkernel/BKE_context.h

C contains: thread index, window manager struct, data-context-struct, and eval struct. The window manager struct contains: a manager, window, screen, area, region, menu, and store. The data-context-struct contains the scene and python context.

blenkernel note:


Many functions defined in blender/source/blender/blendkernel are prefixed with BKE, but not all. CTX_create and CTX_wm_manager are two examples of blendkernel functions that do not start with BKE.

DNA_windowmanager_types.h


The wmWindowManager struct and wmKeyConfig are defined in blender/source/blender/makesdna/DNA_windowmanager_types.h. Other important window manager related structs also define here are: wmWindow and wmOperator. The wmWindow struct contains a pointer to a wmEvent struct named `eventstate`, and a list named `queue` that contains all events. Two other event lists inside wmWindow are: `handlers` and `modalhandlers`.

WM_types.h and wm_event_types.h


Both of these headers are in: blender/source/blender/windowmanager/. wmEvent and other window event related things are defined here, the structs are in WM_types.h and the enums are in wm_event_types.h. Below is the definition of wmEvent:

/* each event should have full modifier state */
/* event comes from eventmanager and from keymap */
typedef struct wmEvent {
struct wmEvent *next, *prev;
short type; /* event code itself (short, is also in keymap) */
short val; /* press, release, scrollvalue */
short x, y; /* mouse pointer position, screen coord */
short mval[2]; /* region mouse position, name convention pre 2.5 :) */
short unicode; /* future, ghost? */
char ascii; /* from ghost */
char pad;
/* previous state */
short prevtype;
short prevval;
short prevx, prevy;
double prevclicktime;
short prevclickx, prevclicky;
/* modifier states */
short shift, ctrl, alt, oskey; /* oskey is apple or windowskey, value denotes order of pressed */
short keymodifier; /* rawkey modifier */
short pad1;
/* keymap item, set by handler (weak?) */
const char *keymap_idname;
/* custom data */
short custom; /* custom data type, stylus, 6dof, see wm_event_types.h */
short customdatafree;
int pad2;
void *customdata; /* ascii, unicode, mouse coords, angles, vectors, dragdrop info */
} wmEvent;